
Position Sizing on Hyperliquid: A First-Principles Framework for Perp Traders
By CMM Team - 24-May-2026
Position Sizing on Hyperliquid: A First-Principles Framework for Perp Traders
Most position-sizing advice in crypto trading is bad. Not wrong exactly, but disconnected from the actual decision a trader is making in front of a Hyperliquid chart at 2 AM. "Use 1-2% per trade" is the canonical retail rule, lifted from equities textbooks where positions are unleveraged and stops are wide. On a perpetual futures venue with up to 50x leverage, asymmetric funding rates, and liquidation prices that move with mark price, that rule is a heuristic, not a framework.
A real position-sizing framework on Hyperliquid has to account for four variables that equities trading doesn't: leverage, funding rate carry, liquidation distance, and cohort-based signal quality. Get any of these wrong and you're either sized so small the win doesn't matter or so large that a normal market wick kills you.
This article builds a first-principles position-sizing framework specifically for perp trading on Hyperliquid. You'll see how each variable enters the decision, why the "% of equity per trade" shortcut breaks down, and how to use cohort positioning data to scale sizing based on signal quality.
Why "% of equity per trade" breaks down
The textbook approach to position sizing is to risk a fixed percentage of account equity per trade. If you have $10K and risk 2%, your maximum loss on any single trade is $200. Pick a stop loss, calculate position size so that the stop equals $200, and execute.
This works in spot and equities because the position size is unleveraged and the only loss vector is price moving against your stop. On Hyperliquid perpetuals, three things break the model:
Leverage decouples position size from capital at risk. A 5x position with a 2% stop risks 10% of the notional. The same dollar position risks more or less depending on the leverage multiplier. The "% of equity" target now has to be computed against the capital at risk, not against the position size.
Funding rates change the cost-of-carry mid-trade. A position you thought was sized for a 3-day hold becomes a 7-day hold if it doesn't move quickly. With negative funding in your favor that's a positive — you're being paid to hold. With positive funding against you, you're paying a fee that compounds hourly. The position size that's reasonable at trade open might not be reasonable after 48 hours of bleed.
Liquidation price isn't your stop. Most traders set a stop above the level at which the position would be liquidated, but the liquidation price moves with mark price and funding payments. A long position whose initial liquidation was 12% below entry can have its liquidation drift to 10% below entry after a few days of negative funding eating into your margin. The position size that gave you 12% of headroom now gives you 10%.
A framework that ignores these three dynamics will produce sizing that's right on average and wrong in the moments that matter.
The four-variable framework
Here's the structure that holds up across market regimes on Hyperliquid:
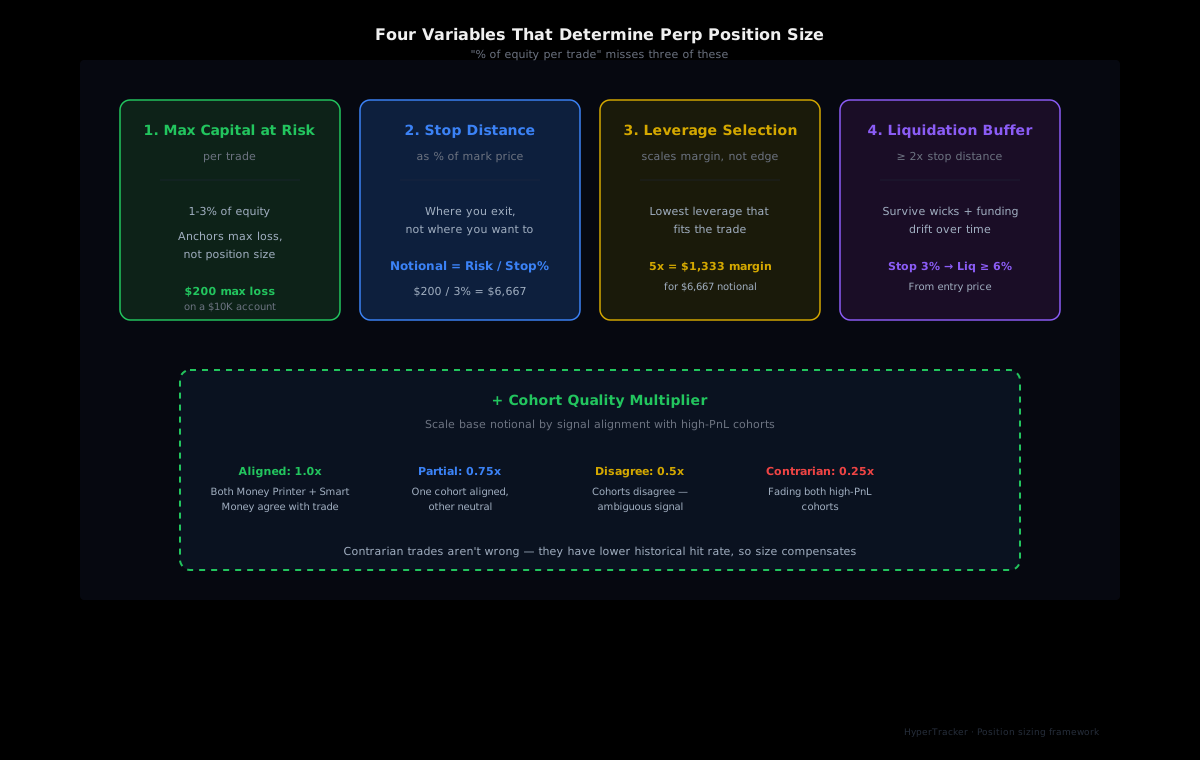
Variable 1: Maximum capital at risk per trade
Start with the same anchor as the textbook approach — pick a percentage of total account equity you're willing to lose on a single trade. For most traders, 1-3% is reasonable. Higher than 3% and a normal losing streak (5-10 consecutive losers, which happens) wipes a meaningful chunk of capital. Lower than 1% and the math becomes inefficient — fees and funding eat too much of the expected value.
This anchor doesn't tell you position size yet. It tells you maximum loss on the trade. Position size is downstream.
Variable 2: Stop distance, expressed as % of mark price
Where will you exit if the trade goes against you? Not where you'd want to exit — where you will exit, mechanically, with a stop order in place. Express it as a percentage of mark price at entry. For a long entered at $80K with a stop at $77,600, stop distance is 3%.
The stop distance combined with the maximum capital at risk gives you maximum notional position:
max notional = max capital at risk / stop distance
If you have $10K, willing to risk 2% ($200), and stop distance is 3%, max notional is $200 / 0.03 = $6,667.
Variable 3: Leverage selection
Leverage scales notional position per dollar of margin posted. To take a $6,667 notional position from variable 2:
- 1x leverage requires $6,667 of margin (66.67% of your account)
- 5x leverage requires $1,333 of margin (13.33% of your account)
- 10x leverage requires $667 of margin (6.67% of your account)
Higher leverage reduces margin required but compresses liquidation distance. The trade-off is concrete: at 1x, your liquidation is roughly at -100% (you can't be liquidated by price alone). At 5x, liquidation is roughly at -18-20% (depending on maintenance margin). At 10x, liquidation is roughly at -9-10%.
The rule: choose the lowest leverage that lets you take the trade you actually want to take, given the margin you have available. If your account can afford the $6,667 notional at 1x, take it at 1x. Higher leverage doesn't improve your trade — it just adds liquidation risk to the same position.
Where leverage matters is when total exposure across multiple positions would exceed your margin. If you want three concurrent $6,667 positions on a $10K account, you need leverage just to fit them. That's a portfolio constraint, not a sizing benefit.
Variable 4: Liquidation buffer
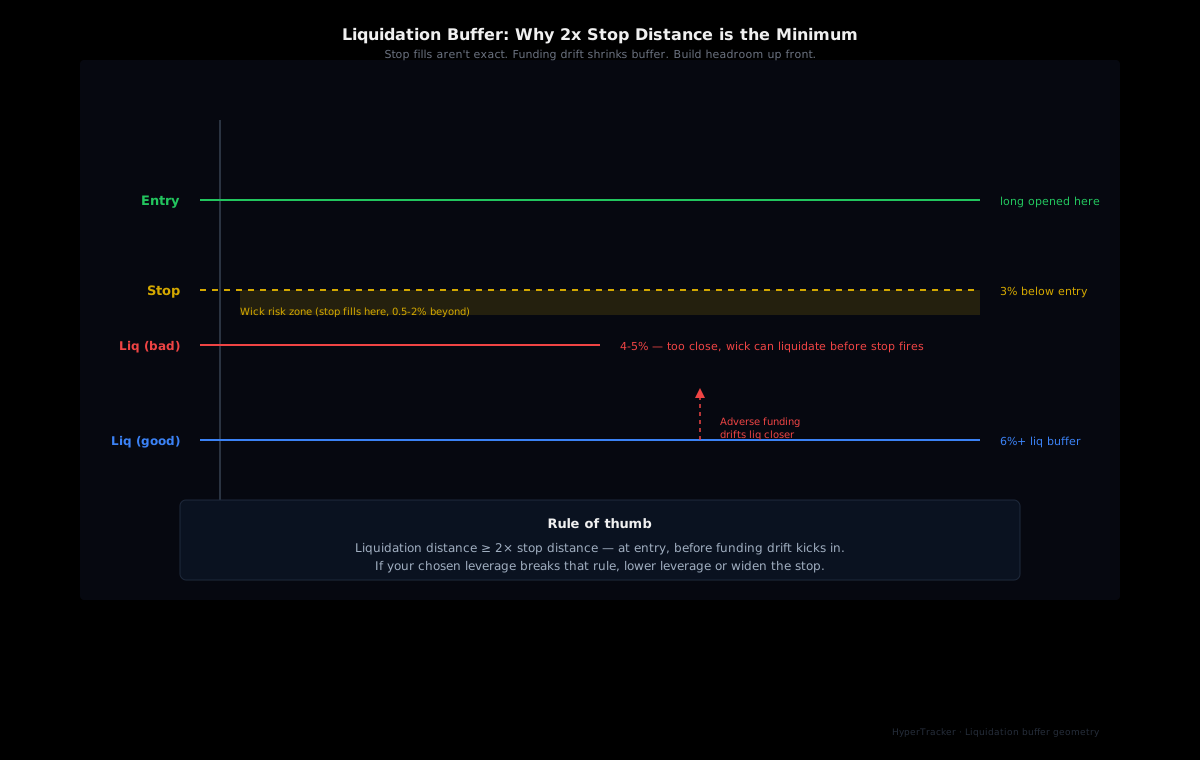
Your liquidation price needs to sit meaningfully beyond your stop. The general rule: liquidation should be at least 2x further from entry than your stop. If your stop distance is 3%, your liquidation distance should be at least 6%.
This protects you against two failure modes:
Wick risk. Stop orders on Hyperliquid execute at the next available price after trigger, not at the stop level itself. In a volatile candle, your fill can be 0.5-2% beyond the stop. If your stop is 1% from liquidation, that fill might trigger liquidation instead of just exit.
Funding drift. Over a multi-day hold, funding payments push your liquidation closer to mark price. A 2x buffer at entry can shrink to 1.5x or less after a few days of adverse funding. Building in headroom up front prevents the drift from becoming a problem.
If your leverage choice from variable 3 doesn't give you a 2x liquidation buffer relative to your stop, lower the leverage or accept a wider stop.
The cohort-quality multiplier
The four-variable framework above gets you to a defensible position size for any trade. But it treats every trade signal as equally valuable, which is the next thing most traders get wrong.
A trade idea that aligns with cohort positioning data on Hyperliquid is a higher-quality signal than one that doesn't. When the Money Printer and Smart Money cohorts are net long an asset, going long has a tailwind. When you're entering a long against the consensus of historically profitable cohorts, you're taking a contrarian position that needs to be sized differently.
The simplest implementation: a cohort-quality multiplier applied to your base position size.
| Signal Type | Multiplier | |---|---| | Aligned with Money Printer + Smart Money cohort consensus | 1.0x (full size) | | Aligned with one cohort, neutral on the other | 0.75x | | Cohorts disagree (one long, one short) | 0.5x | | Contrarian to both Money Printer and Smart Money | 0.25x |
A trade that would be sized at $6,667 notional under the four-variable framework gets sized to $5,000 if only one high-PnL cohort agrees, $3,333 if they disagree, $1,667 if you're explicitly fading both. The math is conservative by design: contrarian trades aren't wrong, but their hit rate is lower historically, so the variance is higher and position size should compensate.
The multipliers aren't sacred — calibrate them to your own backtested results. The framework is what matters: cohort signal quality enters the sizing decision as a quantitative adjustment, not as gut feeling.
Building the framework programmatically
The four-variable framework plus the cohort multiplier translates cleanly into code. A sample sizing function:
def size_position(
    account_equity: float,
    max_risk_pct: float,
    stop_pct: float,
    leverage: int,
    cohort_alignment: str,  # "aligned" | "partial" | "disagree" | "contrarian"
) -> dict:
    max_risk = account_equity * (max_risk_pct / 100)
    max_notional = max_risk / (stop_pct / 100)

    # Cohort quality multiplier
    multipliers = {
        "aligned": 1.0,
        "partial": 0.75,
        "disagree": 0.5,
        "contrarian": 0.25,
    }
    adjusted_notional = max_notional * multipliers[cohort_alignment]

    # Margin required at chosen leverage
    margin_required = adjusted_notional / leverage

    # Liquidation distance check (simplified)
    liq_distance = (1 / leverage) * 100 * 0.95  # rough maintenance margin
    if liq_distance < 2 * stop_pct:
        return {"error": "liquidation buffer too tight, lower leverage"}

    return {
        "notional": adjusted_notional,
        "margin": margin_required,
        "leverage": leverage,
        "liq_distance_pct": liq_distance,
        "stop_distance_pct": stop_pct,
        "buffer_ratio": liq_distance / stop_pct,
    }
Pulling cohort alignment from the HyperTracker API gives you the multiplier input. The rest is mechanical.
# Cohort positioning check
cohorts = api.get(f"/cohorts/positioning/BTC")
money_printer_long = cohorts["money_printer"]["long_ratio"] > 0.55
smart_money_long = cohorts["smart_money"]["long_ratio"] > 0.55

if going_long:
    if money_printer_long and smart_money_long:
        alignment = "aligned"
    elif money_printer_long or smart_money_long:
        alignment = "partial"
    elif money_printer_long != smart_money_long:
        alignment = "disagree"
    else:
        alignment = "contrarian"
The discipline question
The framework is useful only if you actually use it. The most common failure mode is traders who calculate "correct" position size, see it's smaller than they wanted, and override the framework because the trade "feels right."
A few practices that help:
Pre-commit to position size before entering. Calculate size before you place the order, write it down, then execute. The act of writing creates a small accountability check that overrides the dopamine pull of sizing up.
Track override frequency. Keep a log of trades where you deviated from the framework. If you're overriding more than 20% of the time, either your framework is mis-calibrated or your discipline is. Either way, the data tells you which.
Make smaller losses cheaper than overrides. The reason traders override is usually that they don't want to feel the cost of a small position when the trade works. Reframe: the framework is sized for the trades that don't work. If a small position size wins, that's a tax you pay for not losing big when the next trade fails.
Where this framework ends
This isn't a strategy. The framework determines position size given a trade idea — it doesn't tell you which trades to take. Edge has to come from somewhere else: setups, market structure, on-chain signals, cohort positioning patterns, whatever your actual analytical work is producing. Sizing is the layer that converts edge into compounding returns instead of variance.
A trader with a 55% hit rate and tight sizing will outperform a trader with a 60% hit rate and inconsistent sizing over any meaningful sample. The framework above isn't optimized for maximum returns — it's optimized for survivability. The trader who's still in the game after 200 trades has more compounding runway than the one who blew up at trade 47, no matter how good the signals were in between.
Get cohort positioning data for sizing decisions →
The bigger framing
Position sizing is the most underrated edge in crypto perpetual trading. Most retail traders spend 95% of their time looking for setups and 5% deciding how big to go. The math actually flips that — over a large enough sample, sizing decisions dominate setup decisions in determining final account equity. Two traders running the same strategy with different position-sizing frameworks will diverge dramatically over time.
The four-variable framework above plus a cohort-quality multiplier gives you a structure that scales from a $1K test account up to a multi-million-dollar trading book. The mechanics are the same. The discipline to actually use it is what separates traders who compound from traders who fund-drain. Hyperliquid's transparency means the data you need to do this rigorously is one API call away — the rest is on you.